 How to resolve AdBlock issue?
 Steinberg WaveLab 13
Major Update Now Includes Dolby Atmos Support
Authors: Peter Kaminski & Harald Gericke
The new version of Steinberg’s WaveLab 13 editing software has been available since February 2026 - and it is one of the most comprehensive WaveLab updates to date, featuring many new functions and features. The manual has grown to over 1,000 pages. Therefore, we will only focus on some key new features.
Requirements, Installation, and Licensing
Installation is performed using Steinberg’s Download Manager software. A single license allows for up to three simultaneous installations, as is the case with all Steinberg products installed via Steinberg Licensing and the Download Manager.
The Windows system requirements are either Windows 10 (22H2) or Windows 11 (24H2) with an 8th-generation Intel Core i5, AMD Ryzen 3000 series, or ARM processor with at least 8GB of RAM. On macOS computers, macOS Tahoe, Sonoma, or Sequoia must be installed, and an Intel Core i5 (late 2018 or later) or Apple Silicon processor is required with at least 8GB of RAM.
In addition to the WaveLab 13 Pro version presented here, there is also the WaveLab 13 Elements version with a limited feature set available, which is limited to a sample rate of 96kHz instead of a possible 384kHz, a maximum of eight audio tracks, eight instead of 16 Mastering Section plug-in slots, multi-channel formats only up to 5.1 instead of up to 22.1, and Ambisonics only up to first order instead of up to seventh order in the Pro version, to name just a few of the limitations.
Operation and Handling
Let’s now turn to some new features regarding basic handling. An important point is that tabs are now synchronized during playback. When switching from one tab to another, the play cursor remains at the same position. This is a very important feature when comparing reference clips or editing Dolby Atmos.
In the audio editing interface, clips, tracks, and track groups can now be assigned colors according to predefined rules, which improves clarity, especially in large projects.
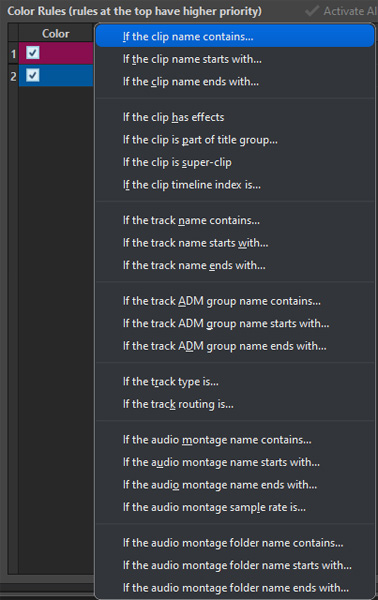
The settings are defined in the preferences, and the selection of rules is very extensive (see the dropdown menu above).
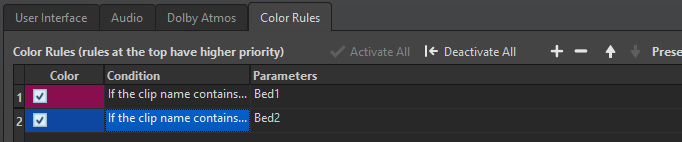
The rules are displayed in a table, and presets can be saved and recalled in the editing interface. Automatic color assignment is also possible.
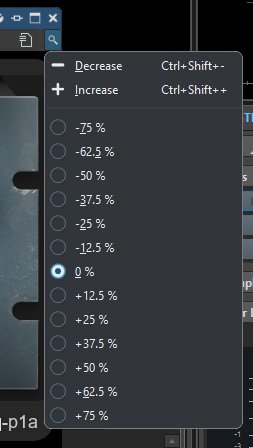
The window size of the plug-ins can now be adjusted.
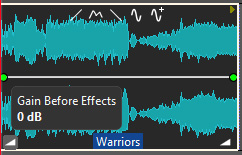
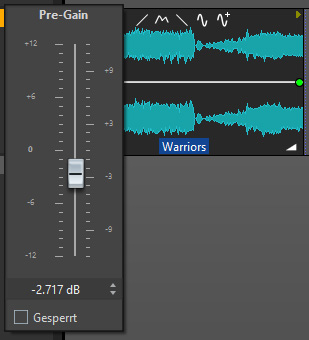
Furthermore, within a clip, the input (Gain Before Effects) and output levels (Gain After Effects) can be adjusted using two icons at the bottom left and right of the clip window. The corresponding fader is displayed for this purpose, and the level can be adjusted using it.
Another new feature is a parallel batch rendering of tracks, regions, and clips with multi-core support. Sections can now also be marked directly using the Marker Ruler, and the Search Track function simplifies track navigation for large projects. The envelope functions have been expanded, and VST-3 compatibility has been improved. Improvements have been made in many areas, such as loading bars for audio processes and the ability to remove plug-ins via click-and-drag - that is, without opening the plug-in selection and clicking “Remove Plug-In.”
Plug-Ins
Of course, WaveLab version 13 also introduces new plug-ins. Some of these were already introduced in Cubase 15 and thus featured in our Cubase 15 review. However, since many WaveLab users work in entirely different application areas, we would like to discuss the new plug-ins here and introduce them.
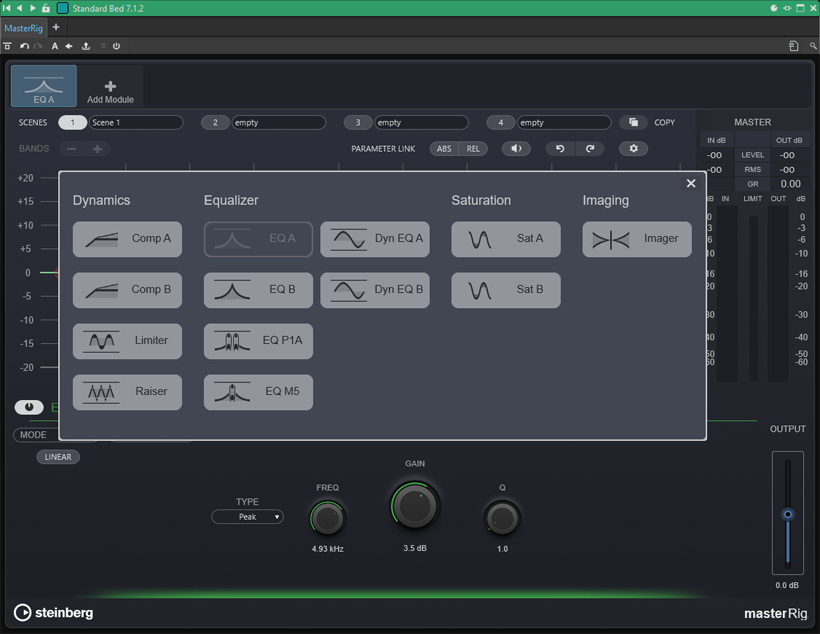
One plug-in exclusive to WaveLab is “MasterRig,” which in the new Version 2 has not only been visually revamped and now looks significantly more modern, but has also been expanded to include new modules such as: Raiser - an alternative to the MasterRig Limiter, the EQ P1A (Pultec EQP-1A tube EQ), and the EQ M5 (Pultec MEQ-5 tube EQ). Mastering engineers will be particularly pleased with these new modules.
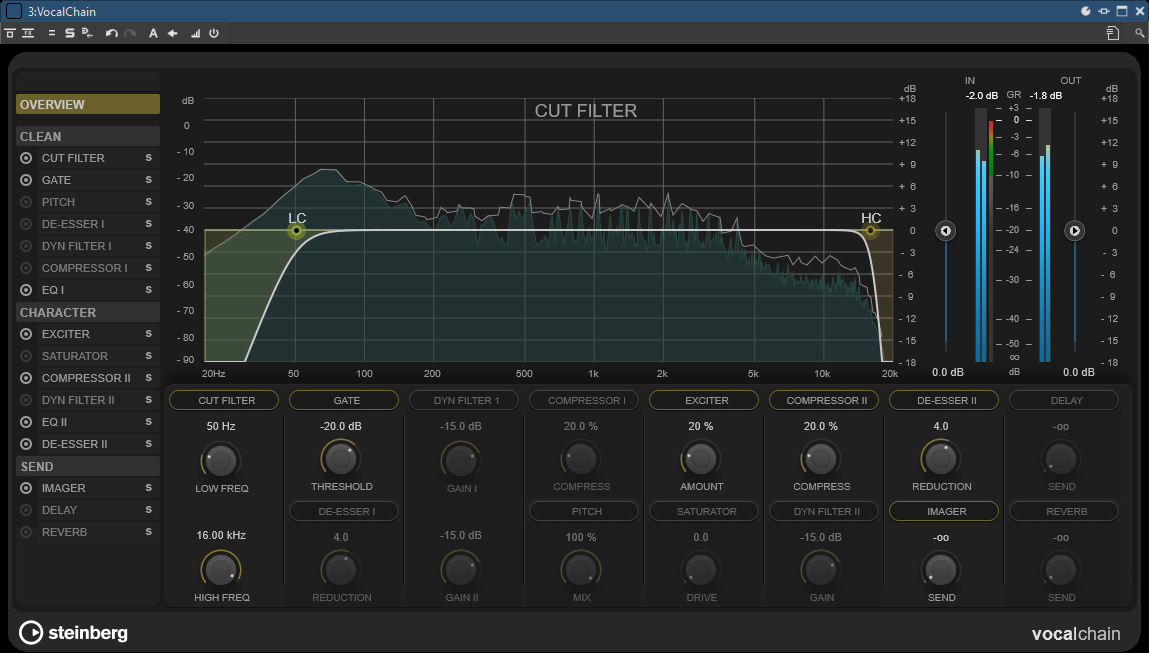
With VocalChain, the company now offers a plug-in for comprehensive vocal processing (see image above), including static and dynamic filters, gate, compressor, pitch shifter, de-esser, exciter, saturation, stereo imager, delay, and reverb - essentially the complete processing chain in a single plug-in.
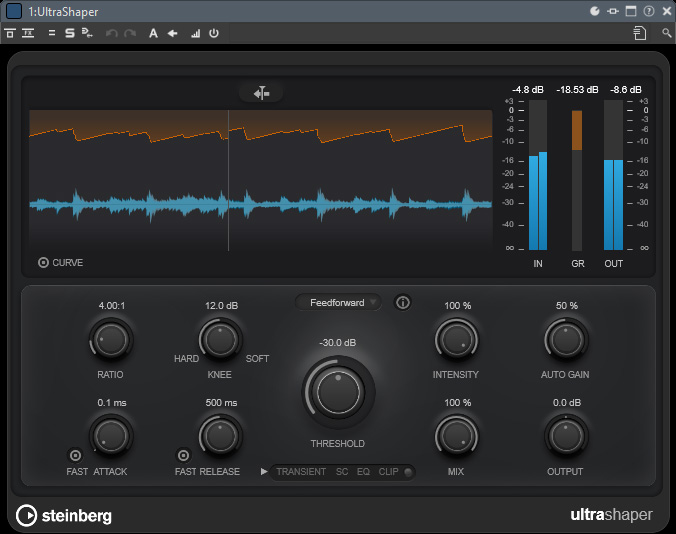
The UltraShaper is a dynamic compressor that automatically adjusts the make-up gain to ensure a consistent output level. It also features a clipping function that allows for additional sound shaping in addition to level limiting.
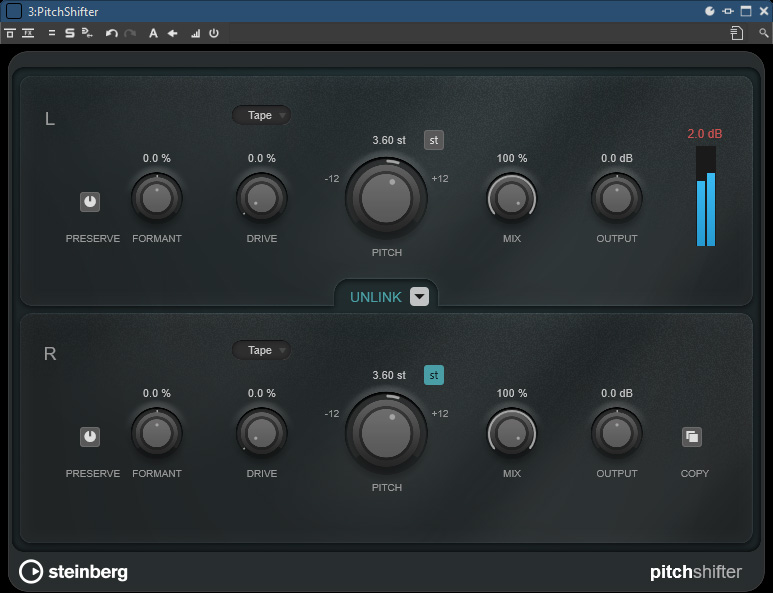
Another new feature is the PitchShifter, which offers three modes: Tape, Tube, and Distortion. The formant parameter allows you to adjust the timbre at the input. The control range extends one octave up and one octave down. The “st” button limits the pitch shift adjustment to semitone steps.
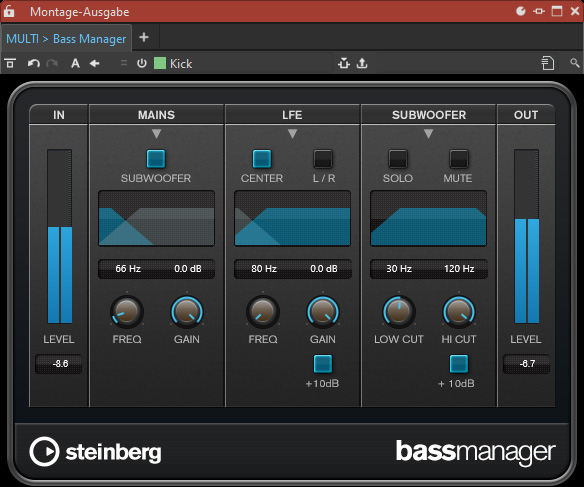
Another new feature is the Bass Manager, which allows for bass/LFE management in a multichannel speaker setup. This plug-in is intended for use in the monitor output channel.
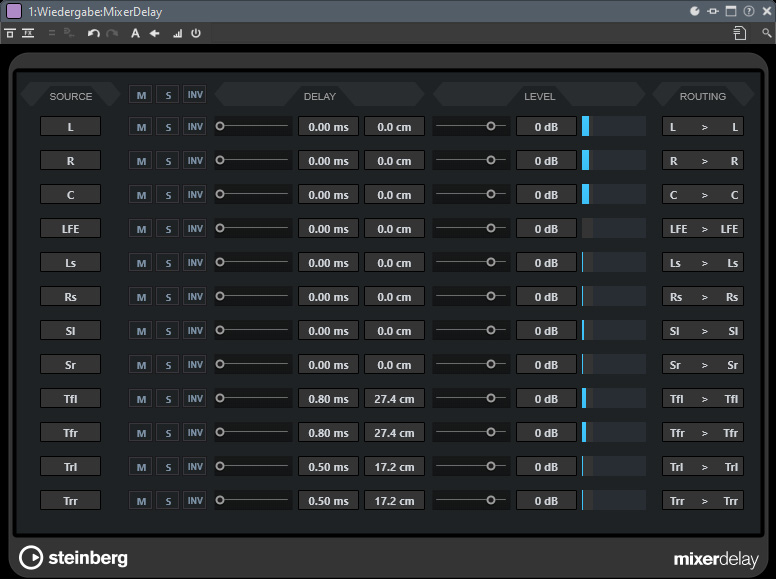
Another new plug-in is Mixer Delay, which is particularly helpful in the context of multichannel projects or multichannel monitoring. This allows individual speaker channels to be delayed to perform time-of-flight compensation if necessary.
Dolby Atmos
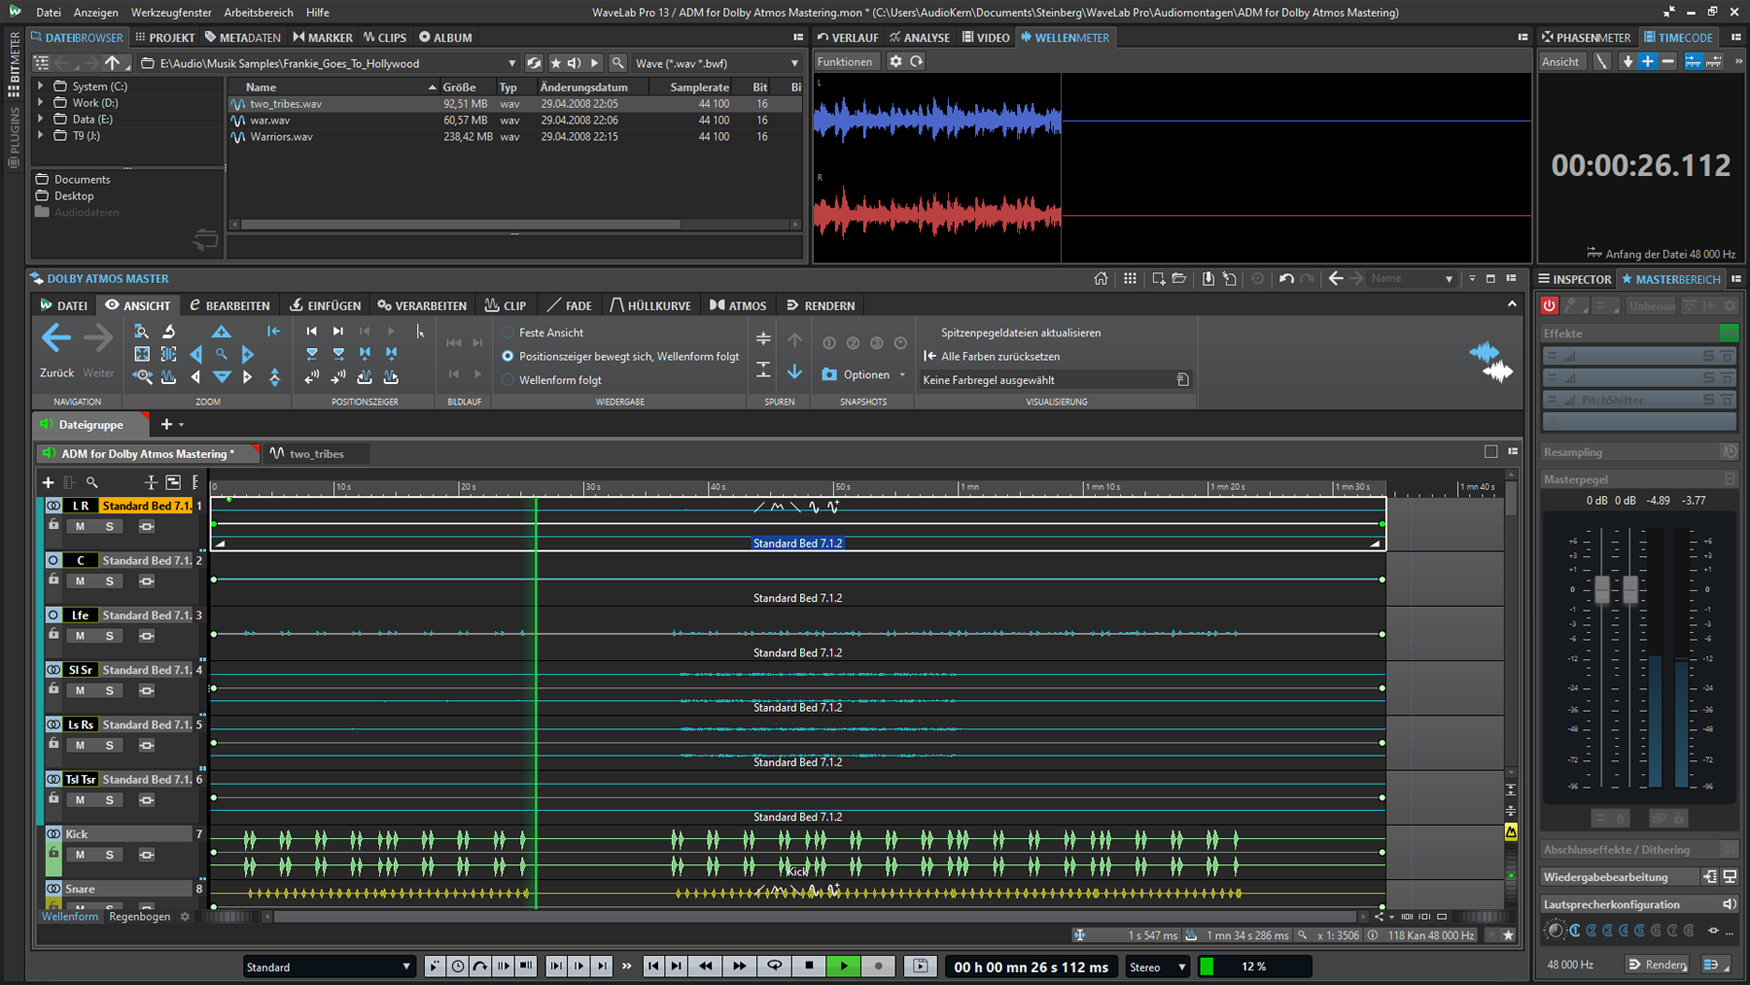
The most significant new feature in WaveLab certainly concerns Dolby Atmos mastering, which is now also possible. The mastering file format for Dolby Atmos is the ADM file, in the form of a Broadcast Wave file (48 or 96kHz sample rate), which contains all audio tracks as well as metadata, such as object positions and binaural data for a track.
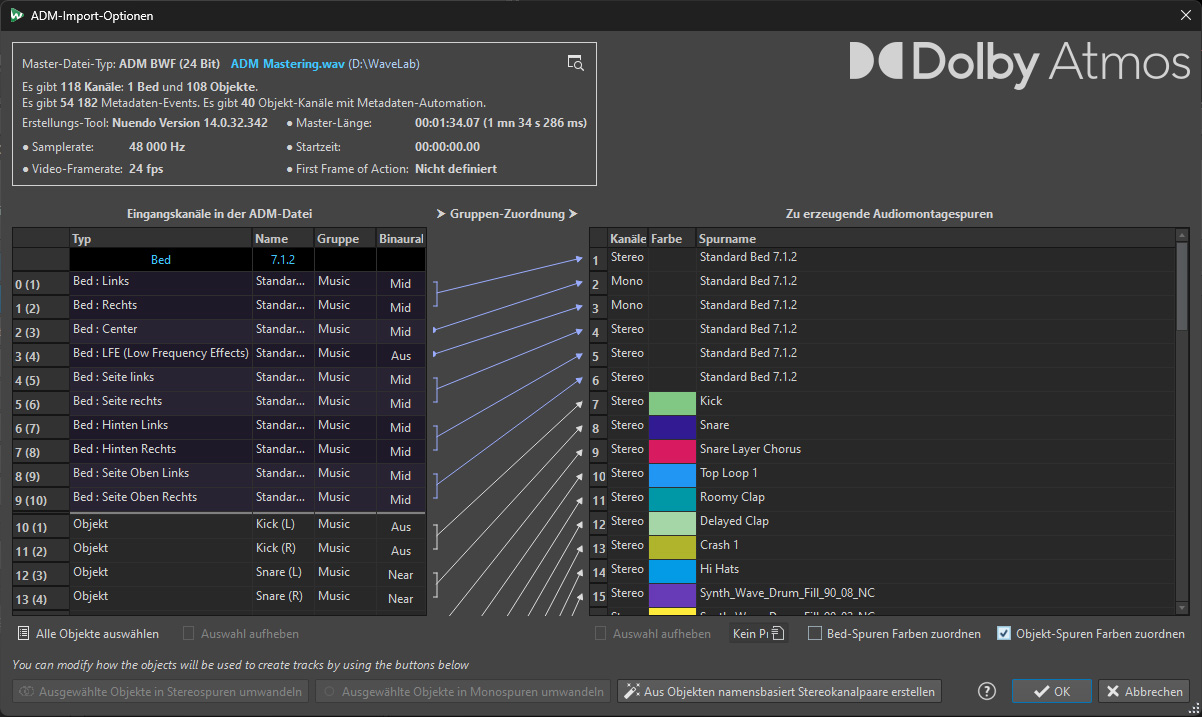
When you open such a file, an information window appears first (see fig. above). If desired, objects can be imported into stereo tracks if the object names allow for such identification. After confirmation and, if necessary, adjustment of the name and destination folder, an audio montage is generated.
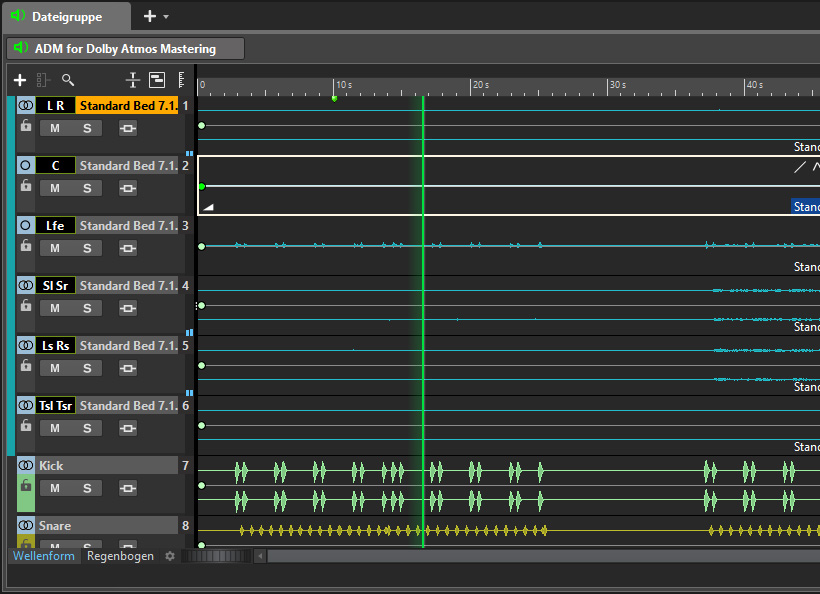
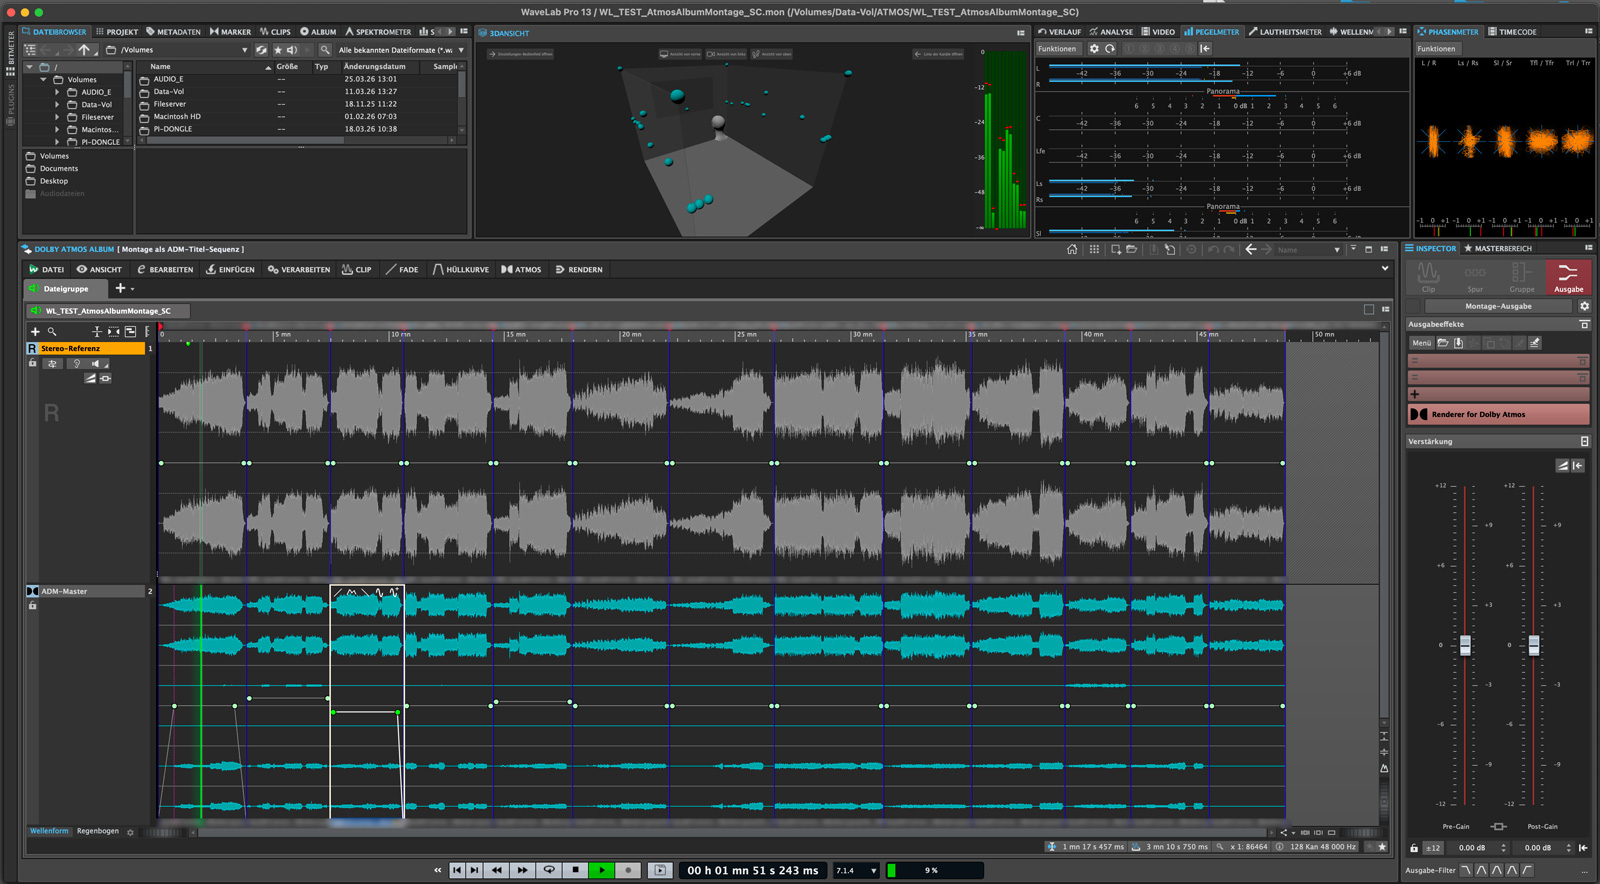
There, the beds and objects are visible on separate tracks (see fig. above).
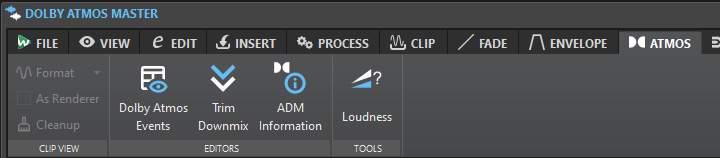
At the top of the montage, there is now also a new tab specifically for Dolby Atmos, where you can, for example, open the information window shown earlier.
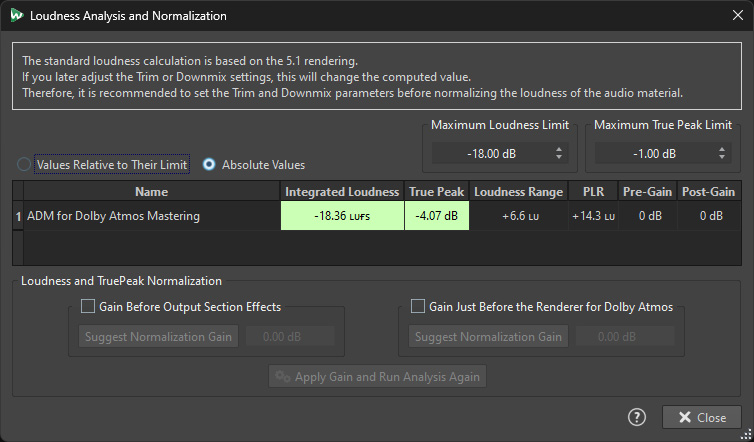
You can also perform a loudness analysis and normalization.
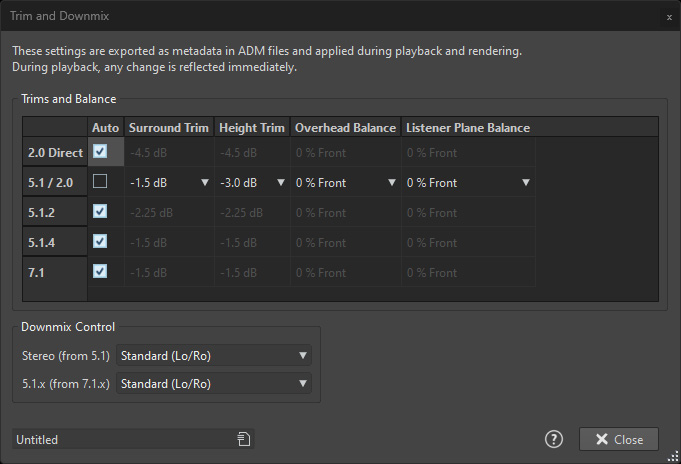
Level trimming along with downmix parameters is also possible here. Conveniently, you can create presets for trim and downmix controls, so you don’t have to manually adjust them again for every track or project.
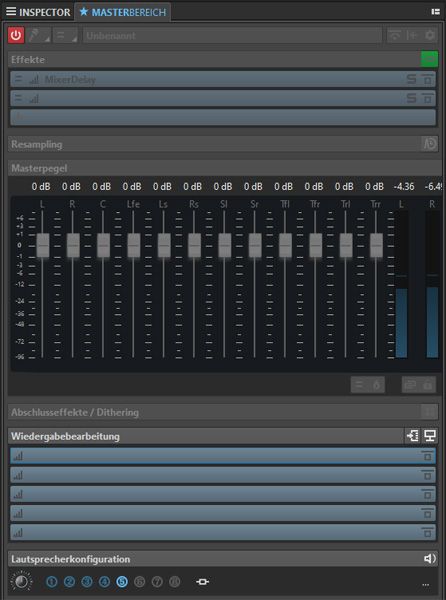
In addition to the standard master section (now with the corresponding number of channels), there is also an inspector tap. Incidentally, in the master section, plug-ins can no longer be loaded or removed in ADM mode.
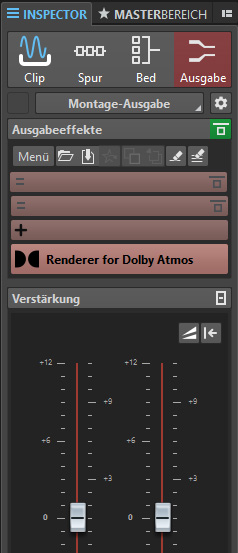
The inspector area is divided into four subsections: Clip, Track, Bed, and Output. Here, you can now route plug-ins to the various components, as well as the monitor output.
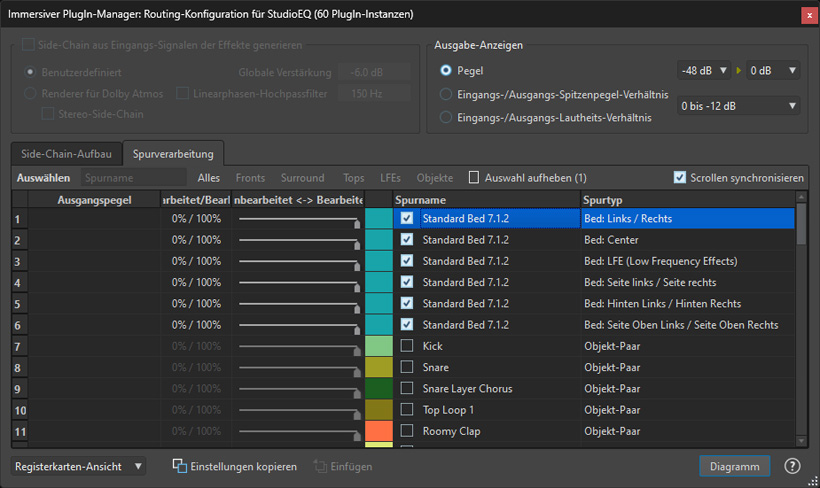
Using the Immersive PlugIn Manager, you can select the beds and objects on which the selected plug-in should act, or use the dry/wet controls to vary the effect. Depending on the selection made, multiple instances of the plug-in are opened. In the Side-Chain tab, you can define a side-chain signal from the individual signals, for example as a stereo downmix.
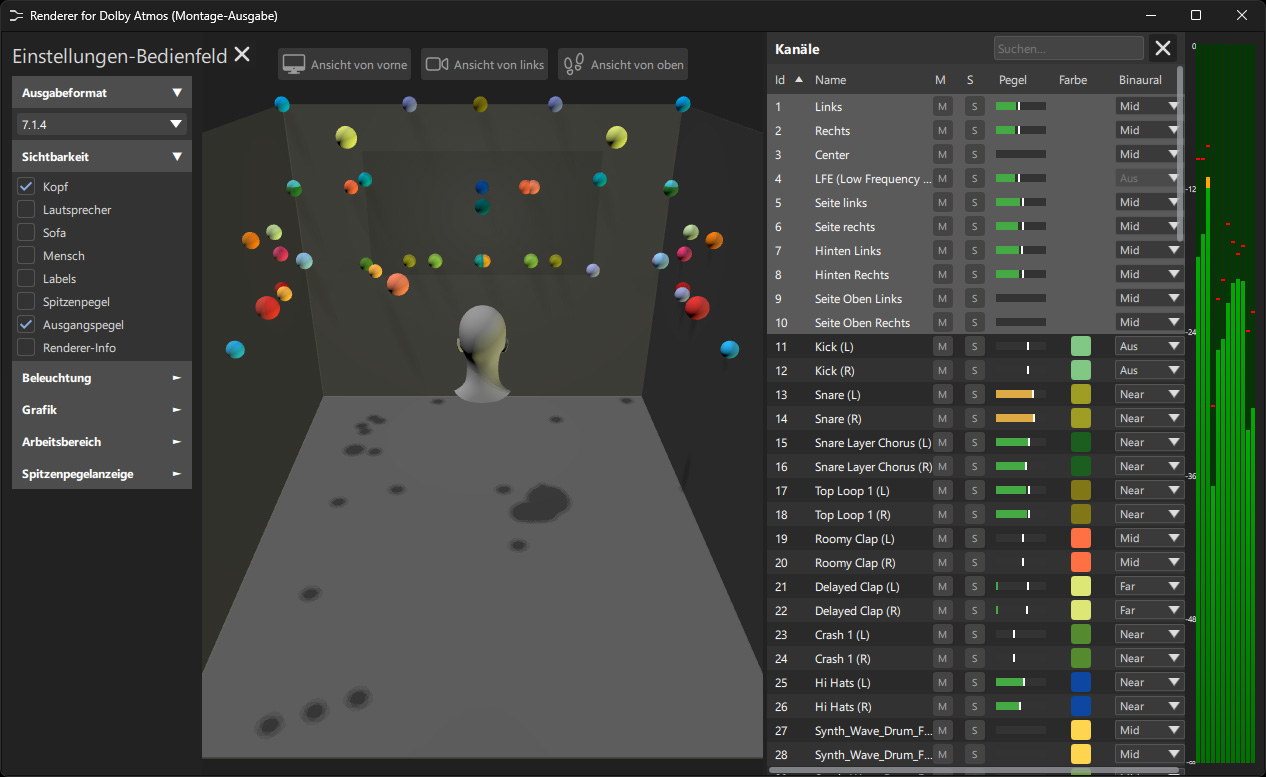
The ADM setup is displayed graphically in the Dolby Atmos Renderer, which looks slightly different from the standalone software or the Dolby Atmos Renderer integrated into Nuendo. Here, there are slightly more display options available. Settings configured elsewhere in Nuendo have been integrated into this renderer window.
As usual, you can also set the monitor output format here. There are a wide variety of display options. For example, in the graphical representation of the beds and objects, you can show or hide speakers, labels, and other elements. Additionally, you can display a level bar graph on the right side of the renderer, which shows a list of various channels. Here, you also have the option to adjust the binaural parameters directly.
Multiple individual ADM master files can be combined into a single album.
There are three modes available:
- ADM track sequence with one clip per track (ADMs can have different structures, which are preserved),
- Compilation of heterogeneous tracks into a single ADM file (here, loudness is measured for the entire album, not for individual tracks),
- Compilation of tracks with identical structure into a single ADM file (crossfades possible due to consistent structure).
The first mode is essentially the default mode. One difference is that in this mode, the number of tracks is preserved during export, while in the other modes, a single ADM master is exported for the entire album.
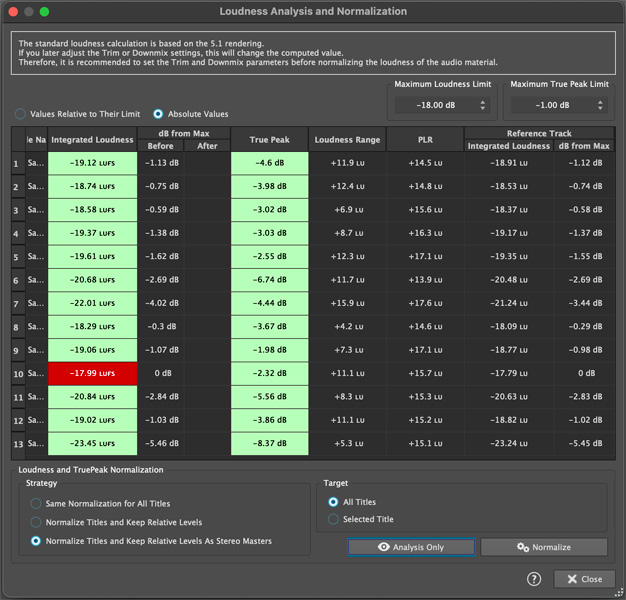
Loudness analysis and editing are also possible in the album montage by specifying the reference track.
In Practice
We tested WaveLab version 13.0.20 on several different DAWs: the AudioKern B14 DAW from Digital Audio Service running on Windows 11, a Dell XPS17 i7 notebook with 32GB RAM, and an Apple Mac Mini M2 Pro with 32GB RAM running macOS 15.7.4. We appreciate that the software can be installed on three computers. It would be nice if all manufacturers offered this. Very sensible and practical improvements have been made to many small details, simplifying and speeding up the workflow.
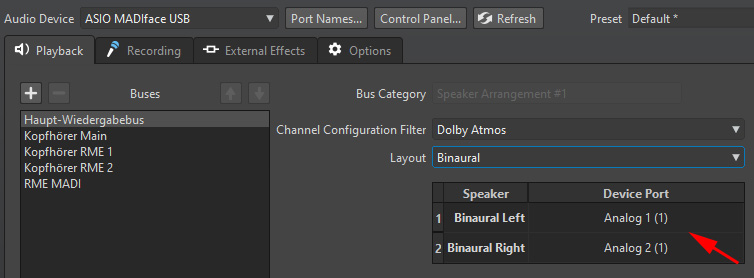
Many users will likely not hear anything at first when switching the monitoring format to binaural. This is because you must define not only the stereo output channels but also the outputs for binaural in the settings under “Audio Connections” and “Playback”. Once you’ve done that, a signal will be present at the defined output and the switch to binaural will work. However, this approach isn’t a drawback, because if necessary, you can directly assign the headphone output for binaural monitoring, and the stereo monitor speakers - which is actually a very practical feature. It’s recommended to route a multichannel monitor directly to the main playback bus. If you don’t do this, a warning message will appear when switching, indicating that channels might be muted.
We encountered one issue during handling: when switching from a stereo montage to an ADM montage, the plug-ins in the master section are bypassed, but they are not completely removed. This means that, under certain circumstances, the latency of the plug-in in the master section can cause the graphical display in the Dolby Atmos Renderer to stop updating dynamically, causing object movements to freeze. This happens, for example, if you have the Pitch Shifter plug-in integrated into the master section. The solution is to open a stereo montage, remove the plug-in from the master section, and then close the stereo mix. After that, everything will work as intended again in the ADM montage and the renderer.
Let’s take a closer look at the ADM/Dolby Atmos workflow. We’ve noticed a few things here. When testing the ADM/Dolby Atmos features, we received valuable assistance from Harald Gericke of platin media productions, who has worked on many well-known Dolby productions and thus gained a great deal of practical experience.
In summary, it must be said that there are many features - such as the multi-channel editing capabilities with plug-ins - that are truly impressive. The direction the developers have taken is exactly the right one. Considering that WaveLab Pro 13 marks the first implementation of Dolby Atmos, they have already achieved a great deal.
In WaveLab Pro 13, you can add reference tracks, which is useful in the ADM/Dolby Atmos workflow. Unfortunately, however, you cannot delete or move tracks in any of the Dolby Atmos mixes to adjust the structure. It would also be desirable for future versions that the graphical renderer view display not only the long object names or descriptions, but also the object numbers or groups as an alternative. Additionally, objects cannot be renamed in various places. In Album mode, unused object tracks are removed, which makes it difficult to maintain a consistent track layout across multiple songs or to make adjustments to it. However, record labels require a specific structure when delivering ADM files, which must be maintained for the entire album. There is still significant room for improvement in how the Album Montage is handled. The object structure is only preserved in the Album Montage if all tracks have the same layout. However, this is almost never the case with pop albums. Additional editing options would need to be implemented here.
In practice, the mastering process for Dolby Atmos differs somewhat from that of stereo productions. Often, an engineer from the stereo production uses stems - that is, individual track groups - to build a Dolby Atmos production, for example using Nuendo. The mastering - if you can even call it that - is then simply handled at the end. This is partly because there are only a few dedicated mastering software applications for Dolby Atmos productions. Whether this workflow is optimal is open to question, since the creation of the immersive project and the mastering are often done by the same person. However, mastering also means that a music project is submitted to a second party who evaluates and edits it without bias, thereby elevating it to a higher level. With Steinberg WaveLab 13, we’re taking a big step in the right direction: toward Dolby Atmos mastering that is independent of the production.
Conclusion
The price for WaveLab 13 Pro is approximately 500 euros, and for the stripped-down WaveLab Elements 13, it is approximately 100 euros. Given the now significantly expanded feature set, WaveLab Pro 13 offers excellent value for money. Updates, by the way, are available exclusively through the Steinberg online shop at various prices. The Dolby Atmos integration is a very positive step into the future of 3D audio productions. The next versions will certainly offer even more advanced options for editing ADM files.